Monday, May 13, 2013

Lasagna Rollatini

Recently I saw a picture with a recipe attached shared on Facebook. The picture immediately caught my eye and after looking at the recipe I knew for a fact that I could make them even better by using my imagination and disregarding the recipe! Tonight I made them for dinner with some input from my children as to what they would like theirs to contain. I made these from start to table in just over an hour.

I started by getting a large pot of salted water boiling and cooked 5 sheets of dried lasagna noodles at a time. While cooking the noodles I finished prepping the rest of my ingredients. I mixed 1 pound of ricotta cheese with a large egg (beaten lightly) and a little bit grated pecorino cheese. I then sliced several fresh off the vine tomatoes. Diced a handful of garlic cloves. Chopped up some spinach, diced a red pepper and an onion as well as some parsley and basil. Once my noodles were cooked al dente I removed them from the pot and layed them flat on a cutting board. Then the fun part began!

Alex requested his to have a clam sauce filling so I sauteed some of the diced garlic in olive oil along with the diced red pepper and onion. I added some clam juice along with chopped clams and a pinch of dried thyme and a diced fresh tomato. I seasoned it with salt, pepper and red pepper flakes and let it simmer down till the liquid had reduced and what remained was nice and thick! I then took it off the stove and sprinkled in some fresh chopped parsley. I let the clam sauce cool while I coated each noodle with the ricotta mixture. Next I sprinkled mozzarella cheese and spooned the clam sauce down the center of each noodle and finished with a light sprinkle of pecorino.

Clams and Peppers and Onions, Oh my!

Ariel requested that I make hers like a margherita pizza. Once again I coated the noodles with a layer of ricotta, a sprinkle of mozzarella fresh basil (mine was frozen from last years garden) and finished with a layer of thinly sliced tomatoes and a sprinkle of pecorino.
As beautiful as the Italian flag

The last ones were my idea. I use to make a veggie lasagna when I was a chef for a living and everyone use to rave when I would put in a layer of my seasoned chopped spinach. So I figured if it works in a pan why not in a roll! I sauteed the chopped spinach with olive oil and garlic. I seasoned it with salt, pepper and red pepper flakes. Once it was all cooked I placed it in a strainer to get some of the liquid out. Once again I coated the noodle with ricotta and mozzarella. Next I added the spinach and finished by adding more shredded mozzarella!


Once all the filling was in place I rolled them into pinwheels making sure to tuck any of the filling back in from the side if it started to fall out. I placed them in my favorite deep sided baking pan and coated them with my homemade sauce that I always have on hand for pasta.


I placed them in the oven for 15 minutes at 450*F. Once the sauce was bubbling and the filling piping hot I covered them all with a handful of shredded mozzarella and put them back in the oven for 5 more minutes!


After the cheese had melted I placed the pan on the counter for 10 minutes to allow the filling to set and make them the perfect temperature for serving and eating!


I hope you are inspired to make this meal yourself and fill it with whatever your taste buds desire!

Saturday, May 11, 2013

Homemade Sweet Tart

I love citrus especially lemons and limes. The smell of lemons reminds me of my Grandmother, Angelina Aquilino. I can remember watching her spritz her wrists with the oil from a fresh lemon peel as an all natural perfume when I was a child and the smell of fresh lemon floods my mind with so many great memories of time spent together. The powers of citrus are amazing, you can use them as a perfume, as a cleaning agent and my favorite as food! 

We tend to make a monthly trip to our local Costco and during the spring and summer months they usually have bags of lemons and limes in the produce section at an amazing price. At the grocery store it is usually close to $1.00 for a lemon and when they are on sale you may find limes 2 for $1.00.During our last trip I decided I wanted limes and for around $5.00 I bought my mesh bag of several dozen limes. 

The first thing I do after rinsing them is slice several of them into wedges and place them next to the water jug in the refrigerator then I juice several of them for use in my daily cooking. Then I start thinking of other ways to enjoy them. 

Last week I decided I wanted pudding. I like making homemade pudding with lemons so I decided I would try making it with limes instead!


Ingredients:
1 1/2 cup sugar
1/2 cup cornstarch
5 cups milk
6 egg yolks, lightly beaten
Grated lime zest (I used several limes worth)
Pinch salt
1 cup fresh lime juice
4 tablespoons unsalted butter, at room temperature

Directions:
Whisk the sugar and the cornstarch together in a medium saucepan. Add the milk and whisk until smooth. Add the egg yolks, zest, and salt and cook, stirring frequently at first and constantly towards the end, over medium heat until thickened.

Remove the pan from the heat and stir in the lemon juice and butter. (If you don't want any bits and pieces you can pour through a strainer) Pour the mixture into a large serving bowl or individual serving dishes.

Let cool to room temperature. Chill, loosely covered, for at least 2 hours and up to 3 days, or until set and thoroughly chilled. Serve chilled.

This can also be poured into a pre-cooked or cookie type pie crust for a key lime pie style desert!

P.S: Next time I think I will skip the butter. I liked the sheen it gave the finished product but didn't care for the buttery notes it gave the pudding.


Monday, March 25, 2013

Winter, Summer, Spring or Fall Baby Back Ribs improve them all

One of my all time favorite foods to cook happens to be ribs, especially pork ribs. I usually buy the baby back ribs which are partially trimmed and usually have some of loin meat still attached. Once I remove them from their packaging I rinse them under cold running water and pat them dry with a clean tea towel. I am a huge fan of dry rubbing my ribs which infuses them with great flavor, breaks down the proteins which not only tenderizes the ribs but it also results in a nice juicy rack!. Once the rub is massaged into both sides of the rack I cut them into smaller portions and store them overnight in gallon sized Ziploc baggies in the refrigerator.  As you can see in the picture below the ribs have marinated and gone from being dry to plump and juicy.
I let the ribs sit out on the counter until they are close to room temperature. I place them in a heavy roasting pan and loosely cover with foil and cook at 250* F. for approximately 4 hours. When cooking a larger batch I usually bump the temperature up to 350* F. for the last hour until the meat starts to pull away from the bones but  the rack still maintains its structure and doesn't fall apart when handled. At this point I preheat my grill and assemble any sauces that we want to glaze the ribs with. Alex usually likes a spicy sauce with plenty of heat, Ariel is more of a sweet and tangy kind of girl, Rebecca likes the bold and spicy style BBQ sauce and I of course like them all. Of course if you are not a fan of sauce you can always caramelize your ribs just the way they are thanks to the coating from the dry rub process. No matter what your taste just make sure your grill is good and hot and once you start don't walk away. Just like the dry rub I like to caramelize both sides which will only take about 2 minutes per side if your cooking over direct heat and the coals are good and hot.

  Of course once you have finished cooking the only thing left to do is grab a plate with your favorite side (mine is a sweet vinegar slaw) and dig in! Alex has learned that there is nothing better than eating them while they are hot and the meat is falling off the bone!
They say your are what you eat and he truly is a HAM! 


Monday, March 18, 2013

The Luck of the Irish

Today is March 18th and we all know that means its the day after St. Patrick's Day. While so many feel the 17th is the day to celebrate the luck of the Irish I feel that the 18th is the more luck of the two days. Why is that you ask? Well, what is better than a hearty dinner of Corned Beef, cabbage, potatoes, onions and carrots?


A dinner of Homemade Corned Beef hash with poached eggs the next! 


Always one of my family's favorites!

Sunday, March 3, 2013

Sunday Lunch Celebration

Today was the second day of Celebration for Alex's 12th birthday. We let him choose the food for today's lunch and he showed that not only is he getting older his taste buds have matured as well.
He requested Bread, Salad, Steamed Green Beans and Salmon with White Rice. 

Nina made the salad which included Feta Cheese and Egg crumbles
Annmarie made the bread which was nothing short of Amazing - can't wait to get the recipe!
I purchased fresh french beans which I steamed and dressed with a pat of butter
The salmon was cooked on the grill with my secret honey/maple seasoning

Of course no birthday celebration is complete without cake. Mom Rathbun has developed the great skill of  creating homemade ice cream cakes. Alex requested that it include strawberry ice cream and much to our delight he got his wish!

Thursday, February 28, 2013

Birthday dinner fit for a King

Tonight was Alex's 12th birthday and as is our family tradition the Birthday Boy (or Girl) gets to pick their birthday meal.Alex didn't disappoint with his selection and I have a feeling it may become a yearly tradition!


Beef loin steaks grilled medium rare over a mesquite smoking box for an unforgettable party on the taste buds! And despite being twelve he requested vegetables for his sides which were homemade mashed potatoes and steamed sugar snap peas. For desert  he requested cheese cake as his birthday cake which of course made me happy!


The most exciting aspect of this meal is that we are having his birthday celebration with the rest of our family on Sunday so I will have another amazing meal to blog about and it's a totally different selection of food!
Happy Birthday Alex, I love you!
Daddy

Sunday, January 27, 2013

Wascally Winter Wabbit

Earlier this week I processed a couple dozen rabbits with my cousin and kept one in the ice box trying to decide how I wanted to cook it. After thinking about it I began to consider that the sweet flavor of rabbit meat might pair nicely with spicy curry. One thing I was sure of is that a spicy curry on a cold dark winter night turns dinner into a comfort meal. I started by taking the rabbit out of the ice box and let it come to temperature on the cutting board.

 Cut into individual servings
I prepped all my veggies - Garlic, Ginger Root, Tomatoes, Jalapeno, Onion, Sweet Pepper and Parsley
I browned the rabbit pieces in a hot pan with olive oil. Once all the pieces were browned I moved them to a plate and sauteed the veggies with the addition of a little chili oil. Once everything was soft I added the rabbit pieces back into the pan. I added a couple ounces of vodka to deglaze the pan before adding 2 cups of chicken stock and some red curry paste.
Once the liquid was boiling I lowered the heat to a low simmer and covered the pan to cook for 2 hours. Once the liquid had condensed to a thick sauce I added in a can of coconut milk and a large handful of unsweetened coconut shavings and returned to a simmer till reduced and thickened. During that time I steamed some rice to go along with the meat. just before serving I added a few splashes of cream into the pan with a handful of fresh chopped parsley.
I accompanied the meal with a local micro-brew Coffeehouse Porter


The entire family enjoyed the meal and we all agreed this was as good as the Rabbit Puttanesca and even better than the normal Braised Rabbit with Red Wine that I usually make. 

Friday, January 11, 2013

Winner, Winner Chicken Dinner

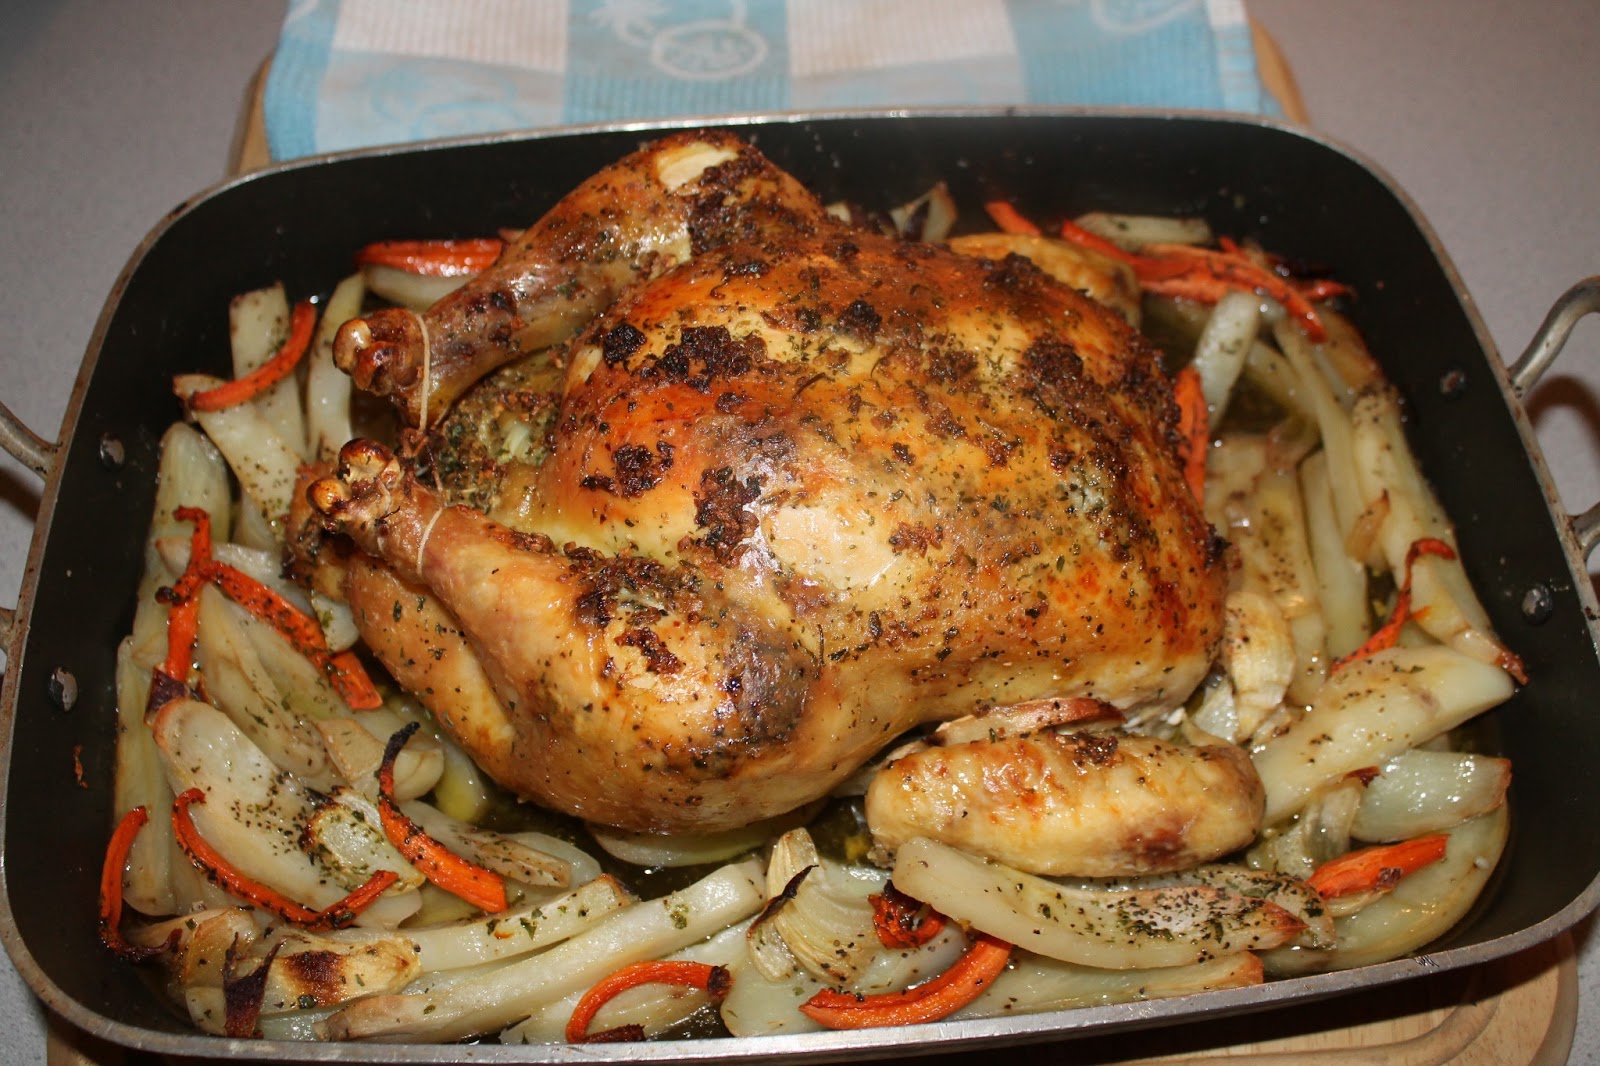
Tonight I felt like a champion as I chanted, "Winner, winner chicken dinner" while prepping the plump and juicy bird. In my little food processor I chopped several garlic cloves with fresh ginger root, olive oil, salt and pepper, red pepper flakes and parsley. I placed the neck and giblets in a stock pot for a mid evening snack and as a way to make base of my gravy. I separated the skin from the meat on the breasts and legs and rubbed the chopped herbs and spices under the skin and the remainder all over the skin. I surrounded the chicken with potatoes, onions and carrots for nostalgic treat.


I roasted it at 350*F for several hours and once the juices ran clear between the legs bones I covered it and let it rest for 15 minutes before slicing and serving. This time though I remembered to take a picture of the final product!


The gravy was delicious on top of the roasted veggies and the fluffy biscuits that Rebecca painstakingly made while the chicken was resting! And the great part about making chicken for dinner is now the bones are boiling away on the stove top for a batch of yummy all natural stock for another meal down the road.

Wednesday, January 9, 2013

Comfort Gourmet

Who says that comfort foods can't be turned into a gourmet dinner? Some times I crave hot dogs and while I prefer a juicy charcoal grilled frank with a natural casing some times a steamed sports venue style hot dog is what hits the spot. Tuesday nights are usually pretty hectic at our house so we often need a no nonsense meal so hot dogs it was. So now you know where the "Comfort" part of the title fits in now onto the "Gourmet" part.
While I love a hot dog with a little ketchup and mustard the are so many other ways to enjoy a cylinder shaped meat. for our dinner tonight I cooked some bacon in the oven while the hot dogs steamed and the jalapeno cheddar melted over low heat. While the meat and cheese were cooking I diced up fresh tomatoes, parsley, sweet onion, green onions and jalapenos. I also cooked up some steak fries as a side keeping with the no fuss utensil free dinner. Once everything was ready I gently placed the hot dogs in steamed potato rolls with a slice of bacon on each side. I topped them with the melted spicy cheese along with all the veggies. There was extra cheese so I topped the fries with it as well! The clean up after dinner was easy with the use of paper plates which ensured everyone made it to their evening obligations with time to spare.


Of course you can use whatever toppings you like best, in the past I have topped these with chili and coleslaw as well! These would be good with natural cased, tofu, chicken, beef or even turkey hot dogs.

Tuesday, January 8, 2013

Pork - it does the body good

Sunday afternoon I decided to make a boneless pork loin for lunch. I wasn't quite sure what I was going to do with it but after rummaging through the pantry and refrigerator I decided I would make a teriyaki style roast. I started by placing the pork roast in a honey teriyaki marinade for an hour. After prepping the rest of the ingredients I placed the pork with the marinade in a roasting pan surrounded by sliced onions, peppers and carrots. I then topped the roast with green onions and parsley. The next layer was diced fresh ginger and garlic with orange juice and then I finished by covering it with pureed pineapple and orange slices and fresh cracked pepper.

I baked it in the oven at 325 degrees for about 3.5 hours. The meat was juicy, sweet and oh so good! Unfortunately after smelling it cook we were all so hungry I forgot to take a picture of it all sliced and plated with the veggies surrounding it but I'm sure you can imagine how yummy it was. I think this is a meal I will repeat as well as try with different types of meat including rabbit and chicken next time!